Pages

Sunday 28 January 2018


It's a new year and with it comes a revived blog for Crafters Cupboard.

It's been an exciting time in the last 7-10 days as we all absorb the new range of exciting products coming out from the annual Creativation Trade Show in Phoenix last weekend and now the Frankfurt Trade Show this weekend.

High on our priorities here at Crafters Cupboard in Australia are the Paper Artsy releases and they have been awesome. 

These have been featured on our Facebook page over the past week, where we have posted all the links on a daily basis as the new ranges for the various designers were released. 

The releases have included fabulous ranges from:

Seth Apter: 2 new paint sets as well as Stamp plates ESA07 & ESA08


Kay Carley: 
Stamp plates EKC12 - 17; Stamp Minis EM25 - EM32 and Stencils PS075 - PS079
(A few sample pics below, taken from the Paper Artsy web site)


Tracy Scott:
 - 1 x paint set FFTS
- Stamp plates ETS14 - 19
- Stencils 087 - 089
(A few sample pics below with some samples of Tracy's stamps & her new paints and some samples from the Paper Artsy blog using the stamps).


JOFY from Jo Firth Young:
- JOFY Stamp plates 59-64
- JOFY Minis Stamps 57 - 64
-  Large Stencils PS081-083
-  Regular Stencils PS084 - 086 
Below some of the stamps and some samples taken from the Paper Artsy blog.


The new stencils work well with the stamps 

The Paper Artsy blog has some fabulous examples from various artists using the various releases - if you have time for a coffee and stroll on their blog to check them all out, go to

Paper Artsy Blog - look for 'older posts' at the bottom of the blog for the above releases

We have an initial order on the way, and if you spot anything you love, please go to our website at 

Crafters Cupboard Website

Chose the Pre Order tab at the top of the page. Those who pre order will be the first to get the new stamps, stencils and paints when they arrive before the rest goes into general stock on the web. We will be ordering more to meet the demand but if you 'can't wait' then pre ordering is the way to go.

So .. onto the links for the new releases from Creativation - enjoy ! 

Zinski Release - this is the latest blog release and great reading !

Til next time

Enjoy that coffee and your catchup on all things new at Paper Artsy

Jen


Thursday 1 October 2015

A New Long Weekend....


A new long weekend has arrived this year so we thought we would celebrate with a 10% off SALE!

This sale applies in-store and on-line, Yes that's right we are opening the shop so you can come browse and treat yourself to some crafty goodness OR click the link Crafters Cupboard and enter the coupon code FOOTY.

We hope you all enjoy our sale and the long weekend! 

Thanks

Olivia


Thursday 24 September 2015

Make a Weekend of it...


With Demo Day on Saturday you could make a weekend of it and come along to the class on Sunday to create some gorgeous Rainbow Girls with our fabulous tutor Naomi Cox.


This all day workshop will have you creating a series of five panels featuring whimsical characters which you can take away to frame for your walls or to give as a gift or gifts. 

By the end of the day you will have learnt new skills, techniques and ideas that can be incorporated into any of your other craft projects such as art journaling, card making and scrapbooking. A highly recommended day to have some fun and come away with these stunning pieces!

If you would like to book just click the link Rainbow Girls

Thanks

Olivia


Wednesday 23 September 2015

So much happening


We have had so much happen since we opened the store life has been a little crazy!!

A few weeks after opening the store we were at the Paperific Expo which was fantastic as always we had a ball with Demo's from Kerry of Whichcraft Do you Do and Anne on the Make n Take table with the fabulous new Brusho's. The three days zoomed by and before we knew it the show was over!


We would like to thank everyone that visited our stand, it was awesome to see old and new faces! Also thank you to our wonderful helpers Anne, Kerry,Margaret and Angela we wouldn't of been able to do it without you. 

If you couldn't make it this time remember there is always next year!

Our Shop & Demo Day

Since we had a a low key opening we thought we would have a Demo Day to make up for it so this Saturday 26th September from 10.30 to 2.30 we will be holding demonstrations on some of your favourite products including Paper Artsy, Brusho's, Dylusions and more! Come along watch how to use these gorgeous products and while you are there you can check out the store and our classroom, maybe treat yourself to some goodies with a 10% in store discount and you could be the lucky customer that wins one of our door prizes!


Here's a peek at the store: 4 Gloucester Ave, Berwick

We would love to see you this Saturday!


Olivia


Tuesday 18 August 2015

Naomi Cox - Canvas Class This Sunday

Hello Everyone

New store is up and running !! Hurrah. We've had a low key opening as we are still in the midst of getting over 7,00 products bar coded on our new POS system and up and running. However, the store has had lots of visitors already which is fantastic ! And such great positive comments too. 

Everyone has said Wow ! when they get to the classroom - so much light, space and super comfy chairs to sit in. We've had 2 classes so far and they loved the space, the environment and a lovely store to wander in when the mood took them

This weekend we have the awesome Naomi Cox in store on Sunday to teach a full day 3 x canvas workshop - some sneak peeks below:

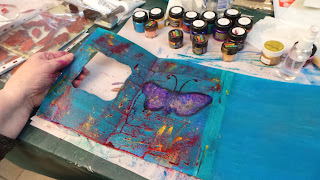
You get to do a butterfly


A Bee


And a Dragonfly


So looking forward to hosting Naomi in our new classroom - she's a great teacher with a lot of talent and no one is disappointed in her work. 

Go to our website www.crafterscupboard.com.au to book. Class is this Sunday 10.00 am to 4.00 pm and you will go home with 3 similar pieces of canvas works at the end of day.

See you there
Jennifer

Friday 31 July 2015

Construction - in Art Journaling & in our new store - Coming SOON


Hello

We have a great group of ladies who come to an art journalling workshop once a month on Saturdays. They've almost finished our 6-7 months Art Journaling Basics course and they've had a fabulous time. Their work has really developed and it's wonderful to see the confidence in using the various different products and mediums in their work. Our last class was all about 'extending' and 'embellishing' and their brief was to add interest to the page with the use of an 'extension'. They also got to introduce some acetate into their work in some way. Here's some photos of what they came up with. Most not completely finished (finishing off is 'homework') but I think they all look pretty good anyway ! Here is Anne's take on the brief:


A variety of products have been used in the various pages, from Paper Artsy Fresco Chalk paints, Grunge paste, stamping, and more. Renate tried stamping on acetate with Stazon ink as well as lettering through a stencil with grunge paste. She was very pleased with her results.


Kylie experimented with using Paper Artsy Grunge paste through a stencil onto acetate. She found it worked really well. Because of the Grunge Paste's fast drying capabilities, she didn't need to risk melting her acetate with the heat gun. Some fussy cutting and she had a fabulous set of wings to go with her face once she had dry brushed colour into it.


Jennie used fabulous colours in her piece, highlighting her texture with various products including Silks - those little pots of paint sure do give a great result. So exciting to see the 'extension' here.


We had Leanne in the class too - I'll try and catch a shot of her page next month. Looking forward to seeing the finished results when they all come back for their next class.

And to finish - some of you will be wondering how the new store is coming along. It's all VERY exciting - here's a few shots of the construction zone - soon to be our wonderful new purpose built classroom. Everyone has been working hard to get the job done and not long to go now.


I guess we are teasing when we tell you that this will be the classroom ! 

We will keep you updated on the opening - not far away at all !

Bye for now
Jennifer

Sunday 26 July 2015

Altered Art Project with DANNII


Hello Everyone

Dannii here with a project which was a little different for me - altering a book box instead of 
playing in my art journal. This was one of those book boxes that you can purchase from a dissent store.


I gave the box a couple coats of gesso and while waiting for it to dry, I grabbed some of my favourite steam punk dies, and cut out a few die shapes from white card stock


Once the book box had dried, I glued the die pieces down on the front cover of the box with a gel medium, making sure I layered the pieces to create texture and interest.
I then gave them a spritz with Tim Holtz Distress spray stains
* Vintage photo
*Brushed Pewter 
*Antiqued Bronze
and
*Walnut stain
Any excess was sponged off with paper towel and dried off with my heat gun.


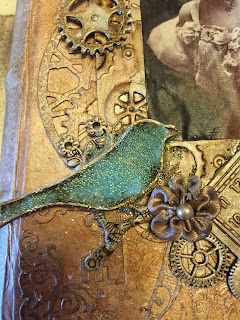
Then I added extra embellishments:  charms, resin flowers, crochet flowers and a aluminium frame which I ran through a clog embossing folder and then some staining 
 with  Ranger alcohol inks.

The picture was a photocopy of some old vintage post cards I found at a local church fete. They actually have postal stamps on them dated in the  1900's so I think they are actually antique and not vintage, which is why I didn't use the original card


Once I was happy with the placement I took a photo of the arrangement and removed all the pieces to give them a coat of gesso


and then a coat of distress spray stains


Once I was happy with the coverage of the pieces, I set them aside to dry
At this stage, I swapped out the post card picture for another that I thought would work better.
and gave the photo a coat of mod podgy to seal it.


I glued the frame over the picture and let everything dry


Using the photo I had taken earlier as a reference guide I glued down all the extra embellishments
with gel medium.


I then added some micro beads (Finnabair -  you can buy them here) to a few bits of the embellishments using a transparent texture paste.


I then added some texture paste and Tim Holtz distress spray to the paste and added it
to the sides of the box, using a palette knife to pull through the paste to make it  look like book pages


Once everything was dry I then added silks acrylic glaze in
*Iridescent gold
*solar gold
*periwinkle
and treasure gold in
*Olive Bronze
and * sapphire
to accent /colour


and a bit more of Tim Holtz distress sprays, spraying onto my craft mat and using a paint brush to add the extra colours.


  Adding the distress paint this way actually helped to layer the colour where I thought it was needed and I was able to tone down the sapphire on the book cover


The finished product
 turned out really well and this photo doesn't do it justice as
there is so much more colour in the original piece.
I hope you enjoyed my tutorial
and I look forward to showing you my next project soon.
For now enjoy what you do and why not try something a little different?
Crafty hugs