Pages

Friday, 31 July 2015

Construction - in Art Journaling & in our new store - Coming SOON


Hello

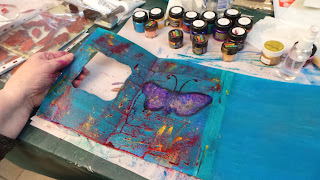
We have a great group of ladies who come to an art journalling workshop once a month on Saturdays. They've almost finished our 6-7 months Art Journaling Basics course and they've had a fabulous time. Their work has really developed and it's wonderful to see the confidence in using the various different products and mediums in their work. Our last class was all about 'extending' and 'embellishing' and their brief was to add interest to the page with the use of an 'extension'. They also got to introduce some acetate into their work in some way. Here's some photos of what they came up with. Most not completely finished (finishing off is 'homework') but I think they all look pretty good anyway ! Here is Anne's take on the brief:


A variety of products have been used in the various pages, from Paper Artsy Fresco Chalk paints, Grunge paste, stamping, and more. Renate tried stamping on acetate with Stazon ink as well as lettering through a stencil with grunge paste. She was very pleased with her results.


Kylie experimented with using Paper Artsy Grunge paste through a stencil onto acetate. She found it worked really well. Because of the Grunge Paste's fast drying capabilities, she didn't need to risk melting her acetate with the heat gun. Some fussy cutting and she had a fabulous set of wings to go with her face once she had dry brushed colour into it.


Jennie used fabulous colours in her piece, highlighting her texture with various products including Silks - those little pots of paint sure do give a great result. So exciting to see the 'extension' here.


We had Leanne in the class too - I'll try and catch a shot of her page next month. Looking forward to seeing the finished results when they all come back for their next class.

And to finish - some of you will be wondering how the new store is coming along. It's all VERY exciting - here's a few shots of the construction zone - soon to be our wonderful new purpose built classroom. Everyone has been working hard to get the job done and not long to go now.


I guess we are teasing when we tell you that this will be the classroom ! 

We will keep you updated on the opening - not far away at all !

Bye for now
Jennifer

Sunday, 26 July 2015

Altered Art Project with DANNII


Hello Everyone

Dannii here with a project which was a little different for me - altering a book box instead of 
playing in my art journal. This was one of those book boxes that you can purchase from a dissent store.


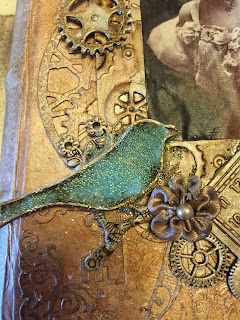
I gave the box a couple coats of gesso and while waiting for it to dry, I grabbed some of my favourite steam punk dies, and cut out a few die shapes from white card stock


Once the book box had dried, I glued the die pieces down on the front cover of the box with a gel medium, making sure I layered the pieces to create texture and interest.
I then gave them a spritz with Tim Holtz Distress spray stains
* Vintage photo
*Brushed Pewter 
*Antiqued Bronze
and
*Walnut stain
Any excess was sponged off with paper towel and dried off with my heat gun.


Then I added extra embellishments:  charms, resin flowers, crochet flowers and a aluminium frame which I ran through a clog embossing folder and then some staining 
 with  Ranger alcohol inks.

The picture was a photocopy of some old vintage post cards I found at a local church fete. They actually have postal stamps on them dated in the  1900's so I think they are actually antique and not vintage, which is why I didn't use the original card


Once I was happy with the placement I took a photo of the arrangement and removed all the pieces to give them a coat of gesso


and then a coat of distress spray stains


Once I was happy with the coverage of the pieces, I set them aside to dry
At this stage, I swapped out the post card picture for another that I thought would work better.
and gave the photo a coat of mod podgy to seal it.


I glued the frame over the picture and let everything dry


Using the photo I had taken earlier as a reference guide I glued down all the extra embellishments
with gel medium.


I then added some micro beads (Finnabair -  you can buy them here) to a few bits of the embellishments using a transparent texture paste.


I then added some texture paste and Tim Holtz distress spray to the paste and added it
to the sides of the box, using a palette knife to pull through the paste to make it  look like book pages


Once everything was dry I then added silks acrylic glaze in
*Iridescent gold
*solar gold
*periwinkle
and treasure gold in
*Olive Bronze
and * sapphire
to accent /colour


and a bit more of Tim Holtz distress sprays, spraying onto my craft mat and using a paint brush to add the extra colours.


  Adding the distress paint this way actually helped to layer the colour where I thought it was needed and I was able to tone down the sapphire on the book cover


The finished product
 turned out really well and this photo doesn't do it justice as
there is so much more colour in the original piece.
I hope you enjoyed my tutorial
and I look forward to showing you my next project soon.
For now enjoy what you do and why not try something a little different?
Crafty hugs

Saturday, 18 July 2015

And the winner is …...


The winner of our 'guess what the picture means' draw is …..


Julie Gibbon

Congratulations !

Please email me at jennifer@crafterscupboard.com.au with your contact details including email, mobile, your postal address and we will get your Goodie bag posted out to you this week.

Draw was done by the lovely Irene Prosser from Manor House Creations.

Thank you Irene for assisting us with drawing the lucky winner's name and thank you everyone for having a go.

What was the correct answer? Yes, we are opening a brand new craft store and classroom in Berwick. Opening should be in about 2 weeks - fit out is progressing well. We will keep you in touch with progress !!


Friday, 17 July 2015

Prize Draw tonight

Good morning

For those of you who follow our Facebook page, you'll know we have a prize draw tonight. You just need to guess what the photo means and your name will be entered into a 'goodie' bag draw - a stamp, stencil and some other goodies to go with it.

Here's the photo

Lots of people so far who are 'spot on' with their guesses - be in to win - last chance - the draw is tonight

Til next time

Jennifer

Sunday, 12 July 2015

Painting on Frabric

Hello Everyone

Hope you are all having a great day wherever you are ! It's a very wet one here in Melbourne but we are busy so not noticing it too much. Apart from a special project (more about that below) we also have a busy programme of workshops. Next Saturday we have Painting on Fabric. Such a fun thing to do. The first part of the class is learning about using your paints when painting on fabric. You can use any of the popular craft/art paints around including your Paper Artsy Fresco Chalk paints, Dina Wakley paints, Dylusions paint or whatever else you have in your craft room. Once you've had a bit of practice, it's on to your project for the day - a choice of bag or apron which you take home with you. You'll be using paint, stencils and anything else that takes your imagination ! 

All materials supplied including the choice of bag or apron - just bring yourself and your lunch for a great day (along with your paintbrushes of course). Bookings via the web here


And now a bit about the special project .. I dropped a photo on the blog the other day of what is clearly a 'construction zone'. You were invited to guess what it is - if you guess right you go into the draw for a goodie bag ! Give it a go … you could be right


Back soon with updates on the new Paper Artsy release which has come out in the UK this week. Some fabulous new stamps  - love them all - and we will have stocks in later this week/early the following week to coincide with the launch of our new 'special project'.

In the meantime, keep guessing and hope to see you at the painting on fabric class next weekend !

Happy crafting everyone
Til next time
Jennifer

Wednesday, 8 July 2015

Action Update

Hello to all our Crafters Cupboard Bloggers

So much happening - and not enough time to stop and update you all !!

Here goes:


  • Geraldine Pasinati held one of her amazing 12 x 12 Mixed Media Classes a couple of weeks ago. Everyone went out the door walking on air, so excited with the 3 pieces that they created during the day, along with learning new techniques and having loads of FUN !! Here's a few photos from the day. 


  • We've had not one but two great art journaling days. Always so much fun to be able to come along and forget everything else that's going on out there and to get lost in a day of creating, reflection, learning and enjoying the company of everyone, learning from each other 
  • We have a photo to share - take a guess at what it means and go into the draw for a 'goodie bag' including one of the new Prima stamps, a stencil and a few other bits and pieces that will delight any avid artist/crafter

  • New products from Paper Artsy are coming - keep an eye out - we will update you as stocks arrive. Some great new stamps coming - we are very excited
  • New classes - check our website here. If you've always wondered about Art Journaling and what it's all about, coming along to our one day introductory workshop this Sunday and get a taste. Book on the website and if you've got questions, call Customer Service on 0448 159 608

Think that's about it for now…….

We'll be back soon with an update on what the 'mystery' photo is all about !

Til then
Jennifer