Pages

Sunday, 26 January 2014

Accordion Album - With a Twist !

Hi folks! Teresa here showing what was a fun afternoon project:


It's an accordion album with a difference - I guess the best way to think of it would be two books intertwined.  Sounds complicated, but it's not.......it's all made from one die: the Sizzix Bigz Accordion Flip 3D Album.

You simply need to cut out however many pages you'd like in your album.  I wanted four, and I followed the simple diagrams in the die packaging to put mine together. Further detailed instructions are available online. Being a Sizzix Bigs die, it can cut a number of pages at once, so the cutting part actually takes very little time at all. Here's how I assembled my book:

Step 1
I cut four pages from white cardstock, five pages from green patterned paper and four orange stripe centre pieces. I have used KaiserCraft's Curiosity range of papers and stickers.


Step 2
Glue the green papers to the white cardstock. The fifth green paper will be glued to the front of the book. Sponge all edges with brown ink.

 
Step 3
Glue the orange pieces to the centres.

 
Step 4
There is a die available that fits perfectly in the centre piece (called the Bracket Frame die), but I found the Spellbinders Labels One a suitable substitute.  I cut four of these out from cream polka dot paper and embellished these pieces before adhering them to the book.
 
I started by applying Coral Glitter Paste through the Fancy Feathers stencil: 


and then I embellished each page with stickers and images I cut out from the patterned paper.  Here's the front page:
 
 
 and here's a view from the top so you can see how the book is put together:


This was a fun way to spend an hour or two. It's possible to keep adding pages in exactly the same way to make a really long book to display on a mantle for example. A book like this with photos of grandchildren would be fantastic for a grandparent's birthday, wouldn't it?  Or a twenty-first birthday with room for everyone's signatures. The possibilities are endless!

Thanks for looking.

Wednesday, 22 January 2014

Birthday Calendar

22nd January 2014

Amazing - the first month of the year almost gone ! Apart from enjoying the sunshine here in Melbourne, and taking a good break over the Christmas and New Year period, we've been busy in the background working on some ideas and also getting ready to introduce some exciting new products to you all in 2014. So - whether you are a scrapbooker, card maker, altered art and mixed media fan or an avid art journaler, you will find something you need at Crafters Cupboard.

Our Design Team have also been busy over the break and we have some great projects to bring to you in the coming weeks which will be fun to try.

Our first project for the New Year is from Holly … 

A cute tag calendar to make and help you remember all those birthdays ! So, without further ado, here's Holly walkthrough on the project ….


This is a beautiful tag calendar that can be used to remember everyone's birthdays. There is a calendar on the front of each tag and plenty of space on the back to jot down important dates.
It is free standing and decorated using the gorgeous graphic 45 "A Place in Time "papers which you can purchase at Crafters Cupboard, along with the other materials I've used.

Products used:
12 x large manilla tags
8" x 8" Place in Time graphic 45 paper pad
Small prima 'Donna' flowers
Magic mount
Double sided tape
Distress inks
Large metal binding ring
Collection of coloured fibbers


Instructions:
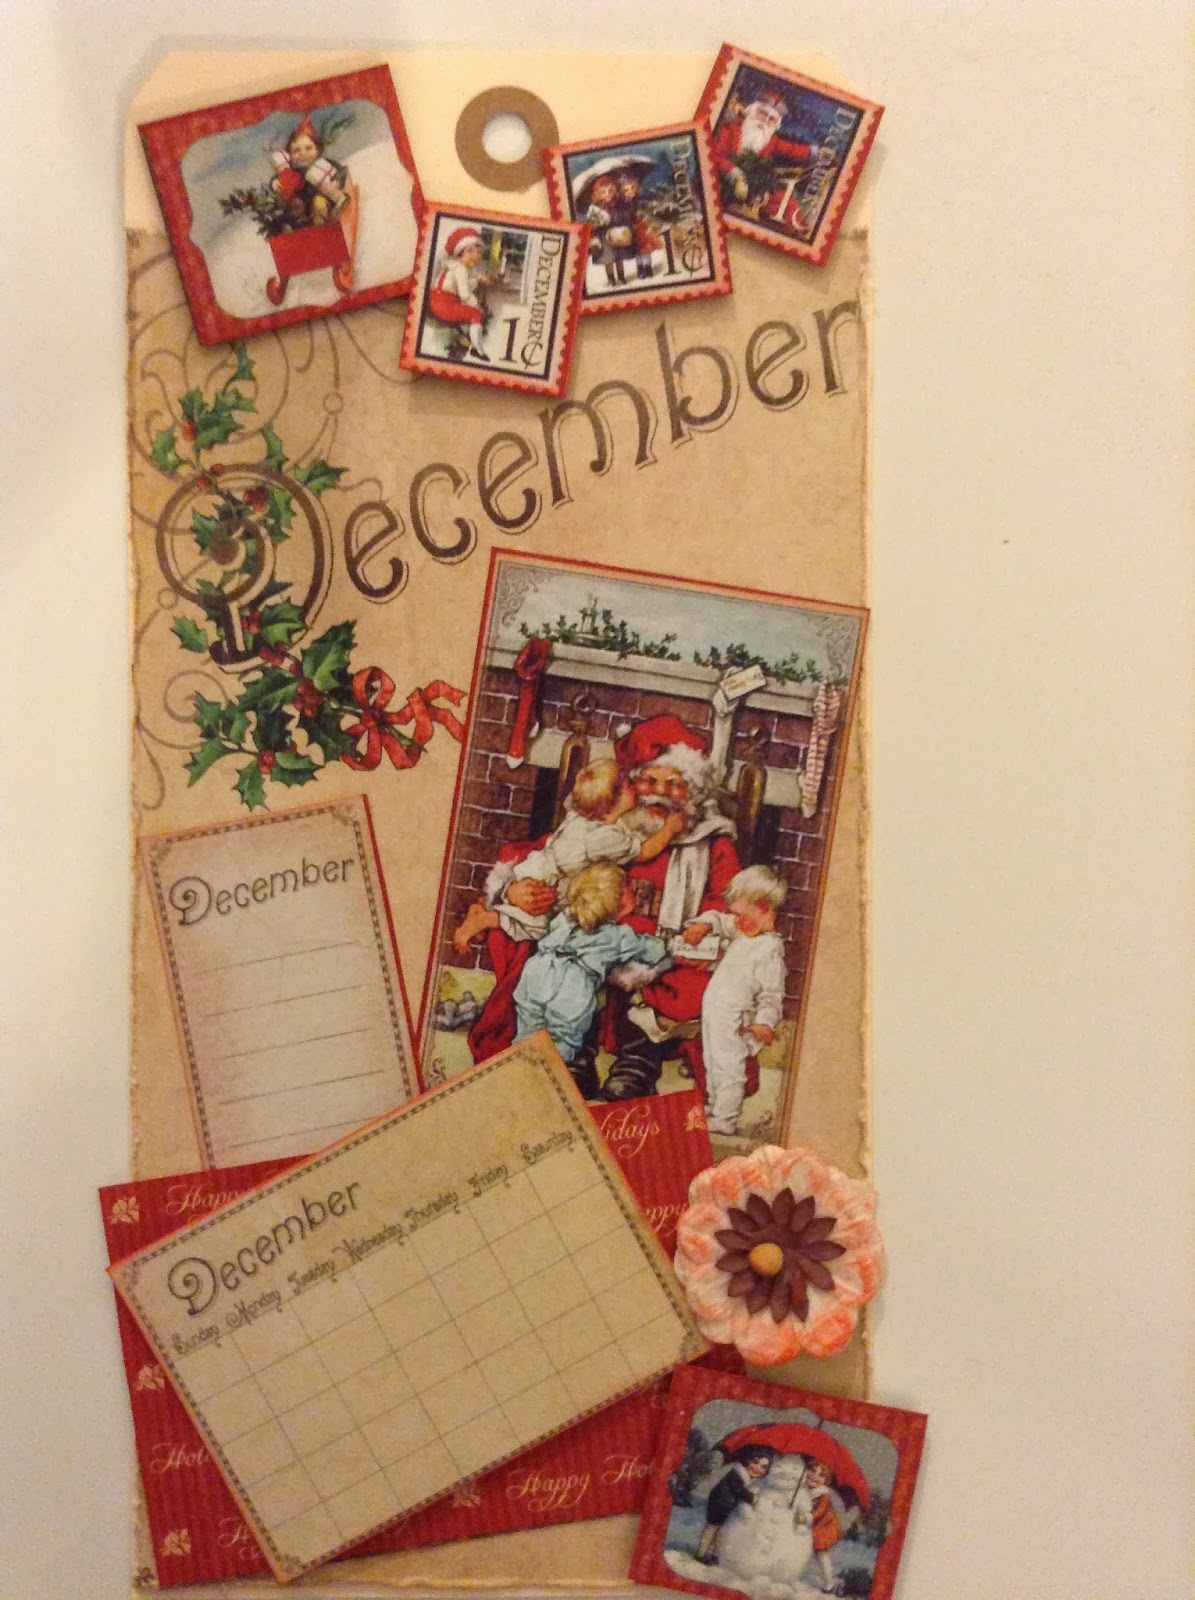
Cut down each of the 12 month pages, distress and ink the pages using antique linen distress ink.
There is a page of cut outs for each month. I have chosen to use a couple of larger pictures, a piece of the background papers and some of the small stamps on each page.

Each piece I have inked in a co-ordinating distress ink and then used magic mount to create height and different layers on each tag.

I have finished each tag by Inking the flower using my blending tool and the co-ordinating distress ink and then edging the whole tag.


And here it is, the final Month of the Year, staring us in the face already. I hope you have enjoyed the Birthday Tag project - a quick, easy and fun little project to make for yourself, or as a gift.


Until next time …
Enjoy !
Holly

Jennifer's Comment

Holly - thank you for sharing this great little tag book idea with us and I hope all our readers have been inspired to make one, either using the Graphic 45 papers, or similar.

We'll be back in the next few days with the next DT submission to share with you all

Until then, Happy Crafting everyone !

Jennifer


Wednesday, 4 December 2013

Scrapbooking Christmas Events


Today we have a Design Team project from Holly - there's always so much fun in the build up to Christmas and these little moments are so worth capturing and scrapping.

And here's Holly with her 'how to' guide on scrapping these great photos ......


My friends little girl just looked gorgeous in her pink gum boots and dress helping her daddy get their Christmas tree I had to scrap the photos.


Product list:

Bo Bunny Little Miss paper range : Little Miss Allie & Little Miss Jamayka
Strips of calico fabric
Thin chipboard
Selection of buttons and scraps of ribbon
Kaisercraft chipboard letters
Treasure Pewter
Dylusion spray in Dirty Martini
Tim holtz alterations bigz die Elegant Flourishes


I started by cutting thin strips of calico fabric and folding them in half . Using 450 glue I glued along the cut edge. 

I then made small snips with scissors all the way along the folded edge as shown in the photo. 


I cut a large triangular tree shape out of chipboard and then glued the strips down to the chipboard. Once completely dry I used my fingers to rub the cut edges quite roughly until the material frayed and it began to look like a bushy Christmas tree! 


I then sprayed the whole tree using dylusions spray in Dirty Martini, glued some buttons on the tree as Christmas decorations and used treasure gold in the pewter colour to make the decorations sparkle.


The Christmas presents were made from circles of patterned paper from the lovely Little Miss paper range from Bo Bunny. I folded the edges to create a dimensional present effect and then tied pretty ribbon round each present.


I double mounted my base paper using the same range of papers and also mounted my photos to tie all the colours in.


The chipboard letters were also sprayed with the dylusions ink spay and the edged with the pewter silver and the flourish was cut using the big shot and coloured with the treasure pewter.


I love this page as I always automatically think that Christmas scrap pages should be in red and green - this page shows I can always think pink!

Monday, 2 December 2013

Another Design Team Project - Great Idea for a Man's Christmas Gift

Well, it's getting hotter by the day and just a little over 3 weeks to Christmas. Today's project post is from Design Team member, Liz Aitken. It's an innovative and different way to present a gift card for a male - and we all know how hard it is to create interesting and different gifts for the guys, so give this one a go !!


Gift Card Holder

Hi everyone,
Well, Christmas is just around the corner and as I am not flying west to spend Christmas with my family this year, I have had to become the Queen of the Giftcard! 
I thought I would share with you a nice way to make a gift card just that little bit more special for the recipient.  This is a vintage style card that has enables the gift card to pop up when you open it.

Supplies

·         One 21cm x 13.5cm piece of kraft cardstock for the card base
·         One 10cm x 13.5cm piece of kraft cardstock for the card front
·         Two 10cm x 13.5cm pieces of cardstock or patterned paper for the card interior – I have used Tim Holtz’ Crowded Attic paper in this project
·         One 27.5cm x 2.5cm piece of patterned paper for belly band – Crowded Attic
·         Scoring tool
·         Gift card with envelope
·         Double sided tape
·         3/4" Circle punch
·         1 3/8" Circle punch or fancy punch
·         Bone folder
·         Distress Inks in your choice of colours for edging – I have used Evergreen Bough, Iced Spruce, Festive Berries and Vintage Photo
·         Stamps of your choice - I used Paperartsy MN03, Backgrounds Plate 3 and Schooldays Plate 2.  Archival Ink in your choice of colour (I used Potting Soil).
·         2 mini brads
·         Twine
·         Montana Paint Pens

Step-by-Step

Step 1

Score the 21cm x 13.5cm piece of cardstock at 10.5cm on the long side and fold.  Decorate inside of card with stamps or patterned paper.  Colour edges with Iced Spruce Distress Ink

Step 2

Add some of the same distress colour (Iced Spruce) to the outside of the card.  Flick with water to get an aged look.


Step 3

Score each of the 10cm x 13.5cm pieces of cardstock or patterned paper at 2.5cm, 5cm and 7.5cm  on the short (10cm) side.
Hint: Using patterned paper as opposed to cardstock for this step will make the card less bulky and easier to close.
Apply Evergreen Bough Distress Ink to the edges of the card.
Apply double sided tape on the outside (ie on the good side of the paper) in the outer 2.5cm sections of each scored piece as follows:


Step 4

Attach one scored piece to inside of card.  Start by aligning the unfolded but scored piece to the center score line, and adhere.  Then fold in half at the 5cm score line and close the card to adhere the other side to the card. 
Burnish well.  Open the card and ensure that all the folds are well creased. Your card should now look as follows:
Distress folded front edge with Evergreen Bough Distress Ink.


Step 5

If your gift card did not come with an envelope, take a scrap of patterned paper, trim to size, fold in half and adhere sides.
If your gift card has an envelope, cut the flap off.
Punch either a pattern section (in this case I have used a Fiskars Jenni Bowlin Quilted Star punch) or a 1 3/8" semi-circle at the top of your envelope.

Step 6

Decorate the front of your envelope


Flip the envelope and rule a line 2.5cm up from the bottom. Place double sided tape underneath the line.


Step 7

Attach the envelope to the middle front of the pop-up piece.

Step 8

Attach other scored section to the front of first attached section including the envelope. Make sure that it is flush to the base of the card as follows:


Step 9

Align the other end of the scored piece to the base of attached section and adhere to card.
Burnish well to ensure adhesion.


Distress the front of the scored section with Evergreen Bough distress ink.
At this point add a sentiment to the inside of the card if desired.

Step 10

Punch two 3/4' Circle and attach to each end of your 27.5cm x 2.5cm piece of patterned paper with mini brad. Tie a reasonable length of baker's twine onto one end.


Step 11

Wrap the band around card and secure it on the back by wrapping twine around both posts. Add double sided tape underneath the belly band at the front of the card to secure.


Note that you are looking at the BACK of the card here, not the front.  Put aside.

Step 12

Take your 10cm x 13.5 cm piece of kraft cardstock and decorate.


NB – I flicked water over this cover after applying distress ink in order to get a shabbier vintage feel to the card front.

Step 13

Attach the decorated front to card, securing it with double sided tape over the belly band


Viola! A pretty neat pop-up card for your gift cards this Christmas.
Till next month,

~ Liz

Thursday, 14 November 2013

This Weeks Design Team Project from Teresa

Hello! Teresa here with a little project you can make in just an hour to give someone special for Christmas. I have made mine into a mini baby album, or grandmother's brag book - and at this size it's perfect to slip into a handbag or post overseas.


Materials
PaperArtsy Stamps JOFY 20
Bo Bunny patterned papers Little Miss Gracie and Little Miss Jamayka
Prima Elementals Resist Canvas Sheet
Bo Bunny Smoochable Trinkets
PaperArtsy Fresco Finish paints in Blood Orange and Rose
Ranger Mini Mister
Prima Au Naturale flowers
Bo Bunny Blush Pansy flowers
Various metal & glass charms
Scrap of pink ribbon
Feathers
Distress Markers for colouring

Step 1
Cut the Little Miss Gracie into 4 inch strips, and concertina them. These will be glued together to make the pages of the book.


Step 2
The PaperArtsy Fresco Finish paints mix with water to make a colour spray! I know - awesome, right! Jennifer was demoing this at recent shows, so I had to try it out myself. Too cool!


Cut a 4.5 inch strip of the Prima Elementals canvas sheet, and spray with the lighter colour until it is covered. Wipe with a wet cloth to remove the paint from the lace pattern and allow to dry. Spray with the darker colour in parts to add interest, again wiping the lace pattern with a wet cloth.


While the canvas is drying, spray the Prima flowers. Here's the uncoloured next to the coloured:


Step 3
Once the canvas sheet has dried, fold the short edges in a couple of inches and machine stitch across the very tops to make a book cover. The concertina book will slip into the pockets on the side to protect the precious photos inside:


I also found a scrap of co-ordinating ribbon and stitched a tab to the outside cover:


This will be where I can hang some charms:

 Step 4
I attached the charms and a little bottle filled with pink mica flakes (glitter would look great too) to the tab, and used my hot glue gun to attach the flowers and a metal charm to the front cover:


Step 5
Using the 4 inch strip of Little Miss Gracie paper that was left over, I stamped each of the birds and the heart a few times, and then fussy cut them.


Step 6
After adhering the photos onto mats and then onto the pages of the book, I coloured some of the birds with Distress Markers and used them here and there to embellish each page and the front cover:


Here I have added little scraps of feather for tails:


Some hand lettering on scraps of left over paper:


...and even some of the words printed on the paper:


I hope you've enjoyed this tutorial. I'd love to see your version of this mini album - link me up in the comments under this post and I'll come visit.

Wednesday, 6 November 2013

Design Team Project from Joan McAlpine


Each week one of our Design Team will be making a project to share with you. We look forward to seeing what you do with the ideas. Here is our very first project from DT member, Joan. Hope you all enjoy having a go at making this different card shape, which is a versatile card shape that can be used for any kind of card, not just Christmas cards.


Diorama Card Christmas Card with Molly Blooms Stamps


Materials:

Piece of Double Sided Design Paper (DSP) – A4 size
Molly Bloom stamps:
    Merry Christmas MB-0198C
    Sleigh MB-0260K
    Presents MB-0042K
    Reindeer MB-0259H
Fine glitter
Glossy accents
Mounting foam
Rich Cocoa Memento ink
White cardstock

Diorama Template:


Instructions:

Cut the DSP using the diorama template and glue together to make a box with flaps. This forms the basis for your scene.
The side flaps can be any width - paper size permitting, but flaps need reinforcing with additional paper so it stands well


The depth of the box is half (4cm) of the top measurement for the top of the box (8cm).
Stamp images (2 Reindeer, 2 Presents, 2 Sleighs) onto white cardstock and colour in, using your favourite markers e.g. Copics, Promarkers etc.
Cut out images and layer (layered reindeer saddles, red and beige present, holly and heart, middle girls hat and jacket) with mounting foam to create the scene as shown in the photo.
Add string for reigns, and red pearl or glitter for Rudolph's nose
Add fine glitter using glossy accents to snowlflakes, hat trims etc to finish.

Using the diorama template you can make a different and fun Christmas card using any Christmas stamps in your stash.

Gentle reminder – Christmas Day is 7 weeks today !

Monday, 4 November 2013

News Flash and Sneak Peek


Newsflash .............


Due to popular demand, we've changed our workshop timetable for this coming Saturday to hold a canvas class. This is the canvas which has been on display at both Paperific and the Sandown Picture to Page show a few weeks ago.

Some sneaky peeks here ...


This canvas is LOADED with all sorts of exciting elements, some of which you'll learn to make yourself with the material that are supplied. There are lots of new techniques to learn and practice and a wide range of products will be used through out the day. I had my doubts as to whether we could do it in a day, but with careful planning I think we can .. just.

The workshop will run for a FULL day on Saturday, starting at an earlier time of 10.00 am. Be prepared to learn lots, and have lots of fun along the way.

There will be scope to change your colour scheme if you wish and the chance to let your imagination follow it's own path. Be quick to enrol though - it's this Saturday. You can sign up for it via this link to our  website  .www.CraftersCupboard.com.au   by clicking on the Workshops and Classes tab at the top of the page.

I'm looking forward to it already.


Jennifer