Pages

Tuesday, 28 January 2014

Mixed Media Mini Book Workshop

Hi Folks

Just a quick note to tell you about an exciting new workshop series we have coming up later in February, which will take place over 2 consecutive weekends (Saturday 22nd Feb and Saturday 1st March) in Berwick.

You'll learn new techniques, including how to make card look like leather,  using texture and mixed media (fabric, metal, paper, to name a few) to create a double mini book with a nature theme. You'll be making your own embellishments, including the use of some natural materials - I've already seen the book made up and it's an absolute treasure ! I'm itching to make one myself  as this project has a real twist to it, and the techniques can be applied to bigger projects once you've learnt the basics.

The cost includes materials, so just bring along yourself, your lunch and your tool kit and be prepared for a busy day !

As there is a lot to this project, the two workshops will run from 9.30 am through to approx 4.30 pm. Pop along to the website and book quickly as places are limited - you will be delighted with the mini book that you make, you'll get to meet a new & talented Tutor who has joined our team in 2014, and as well as having fun, you'll learn a lot !! Go here  to book your place !!

Here's some photos to give you a sneak peek of what's to come


See you soon. ...


Jennifer

Monday, 27 January 2014

How to make a Grunge Flower using Paper Artsy Dies & Metal Card

Hello Everyone from Joan

I love nature and in particular flowers, so when I saw these dies and the matching stamp I just had to have them.  The grunge flowers are easy to make and can be made out of design paper, card or metal shim.  The metal backing card makes the flower more flexible and helps to hold it's shape.

 Requirements - all found on the  Crafters Cupboard website.


1.   Mark an arrow (if not already done) at 1 o’clock on reverse of the ezymount on the back of the Hot Picks Flower Stamps so you can line up the die and the stamp later.  


2.   Glue the piece of metal on card to the paper or card that you are going to use.   Use a substantial amount of glue as you don’t want the layers to split, however you don’t want glue squeezed out onto your Big Shot when you run the dies through it.


3.   Place dies onto top (face down) of paper.  Secure with tape if necessary.  You need to cut one of each size (Dies 1,2,& 3)


4.   Run through Big Shot twice

5.   The die has a tiny notch that you need to align with the stamp.  Put a pencil mark at the notch BEFORE you remove the die.  It is really hard to line this up after, believe me.


6.   Line up the stamp with the arrow to the pencil line and stamp.  You don’t need to stamp at all and I have stamped the top and bottom only.

7.   Cut the smallest top petals about 0.5cm towards the centre.  The middle and largest bottom petals cut 1.5cm towards the centre.

8.   Manipulate the petals by folding them up towards the centre and squeezing them together.  They don’t roll like roses!

9. Layer the flowers, using foam dots or silicon.


10.  Add an embellishment to the centre.  These are some that I have made. 


     The blue and orange one is made using Paper Artsy paint.  These are fabulous embellishments for many projects and you can make them out of so many different mediums from Design Paper to Card to Canvas. Well worth a try and with a bit of practice you will be making fabulous flowers to decorate your many different projects, or even to embellish a beautifully wrapped gift for somebody. Give it a try !!

Until next time, Happy Crafting from

Joan

Sunday, 26 January 2014

Happy Australia Day - We have a SALE to celebrate !!


Hi Folks

Hope you've all had a great Australia Day - and hasn't the weather been fantastic ! Certainly here in Melbourne it has been just glorious with temps in the 20's and blue, blue sky !

It's not often we do this - in fact this is a first ! Crafters Cupboard are having a Sale, just to celebrate this very special day here in Australia (and also because we have some FABULOUS new stock on the way and we need to make room for it in the stock room - but more of that to come in the days and weeks ahead - trust me, it's exciting stuff !!)

So - here's the Sale deal:

10% of all and any items that we have in stock on the Web. 

Sorry -  doesn't apply to out of stock orders or any other offer that we may have.

So - for all you Paper Artsy fans out there, make the most of this little bonus in your shopping cart. Don't forget all the other great products that we have in store too to help with your scrapbooking, card making, journalling and other projects !

When you get to the checkout, please enter Coupon Code AUSDAY to get your 10% off your order. But be quick - this offer is only open for the next 5 days until Friday the 31st !!

Log in here to start your shopping   www.crafterscupboard.com.au


Journal Cover Inspired by Finnabair


Hi everyone - Liz here today...

Well, Christmas is over for another year, and I am still recovering from the festivities! 
I thought I would share with you instructions for the Finnbair inspired pieces I was doing on the Crafters Cupboard stand at Paperiffic.  I have turned some of these into journal covers.

Supplies

·       A small piece of book board or a cabinet card if you have one.
·       Masking Tape.
·       A face stamp  – I particularly like the Lynne Perella No 15
http://crafterscupboard.com.au/lynne-perrella-collection-015-stamp-paper-artsy
·       White cardstock.
·       Black Archival Ink.
·       Grunge paste.
·       Stencils.
·       Discarded bits of lace.
·       Bits and pieces from your stash – buttons, old bits of metal, laser-cuts, cardboard letters, ball chain –anything that has shapes you like.  Colour is not a problem.
·       Glue Gun.
·       Glossy or Matte Accents.
·       Gesso.
·       Fresco paints.
·       Dylusions.
·       Treasure Gold.
·       Fixative
·       Gloss Varnish.

Step-by-Step

Step 1

Use masking tape to completely seal the edges of your piece of book board or cabinet card.
Stamp your face stamp onto card cut out and adhere to your board.
Use grunge paste through your favourite stencils to add base texture onto the board and the card.  Adhere lace or other fabric as desired.  Dry thoroughly.


Step 2

Arrange elements from your stash in a pleasing design, focusing on the shapes.  Adhere with glue gun for the major elements, and smaller elements with glossy of matte accents.

While the picture below is from a different project, it gives you a good idea of how to lay out your elements. The colours are irrelevant as you will see in the next steps - it is the design that matters.


Step 3

Protecting the face with a piece of paper towel or a baby wipe, cover the entirety with a couple of coats of gesso, ensuring that as much of the colour is eliminated as possible.  Dry thoroughly.


Step 4

Using your chosen fresco paint colours, (I have used zesty zing and mermaid) put colour onto the piece in sections, blending thoroughly at the edges.  Make sure that you get the paint into all the nooks and crannies.  Dry thoroughly.


Step 5

Using similar colours in dylusions, thoroughly spray and mix over the piece to heighten the colour.  I did 2 coats, heat drying the first (that helps to crack the gesso and paint), and then let the second coat puddle into the back of the pieces and letting it air dry.  This helps to add depth.
Use treasure gold to add highlights. Add a little colour into the face with acrylic paint (cheeks & lips).
Spray with fixative to seal the dylusions before covering the whole with a glossy varnish to completely seal.


Till next time!
~ Liz


Accordion Album - With a Twist !

Hi folks! Teresa here showing what was a fun afternoon project:


It's an accordion album with a difference - I guess the best way to think of it would be two books intertwined.  Sounds complicated, but it's not.......it's all made from one die: the Sizzix Bigz Accordion Flip 3D Album.

You simply need to cut out however many pages you'd like in your album.  I wanted four, and I followed the simple diagrams in the die packaging to put mine together. Further detailed instructions are available online. Being a Sizzix Bigs die, it can cut a number of pages at once, so the cutting part actually takes very little time at all. Here's how I assembled my book:

Step 1
I cut four pages from white cardstock, five pages from green patterned paper and four orange stripe centre pieces. I have used KaiserCraft's Curiosity range of papers and stickers.


Step 2
Glue the green papers to the white cardstock. The fifth green paper will be glued to the front of the book. Sponge all edges with brown ink.

 
Step 3
Glue the orange pieces to the centres.

 
Step 4
There is a die available that fits perfectly in the centre piece (called the Bracket Frame die), but I found the Spellbinders Labels One a suitable substitute.  I cut four of these out from cream polka dot paper and embellished these pieces before adhering them to the book.
 
I started by applying Coral Glitter Paste through the Fancy Feathers stencil: 


and then I embellished each page with stickers and images I cut out from the patterned paper.  Here's the front page:
 
 
 and here's a view from the top so you can see how the book is put together:


This was a fun way to spend an hour or two. It's possible to keep adding pages in exactly the same way to make a really long book to display on a mantle for example. A book like this with photos of grandchildren would be fantastic for a grandparent's birthday, wouldn't it?  Or a twenty-first birthday with room for everyone's signatures. The possibilities are endless!

Thanks for looking.

Wednesday, 22 January 2014

Birthday Calendar

22nd January 2014

Amazing - the first month of the year almost gone ! Apart from enjoying the sunshine here in Melbourne, and taking a good break over the Christmas and New Year period, we've been busy in the background working on some ideas and also getting ready to introduce some exciting new products to you all in 2014. So - whether you are a scrapbooker, card maker, altered art and mixed media fan or an avid art journaler, you will find something you need at Crafters Cupboard.

Our Design Team have also been busy over the break and we have some great projects to bring to you in the coming weeks which will be fun to try.

Our first project for the New Year is from Holly … 

A cute tag calendar to make and help you remember all those birthdays ! So, without further ado, here's Holly walkthrough on the project ….


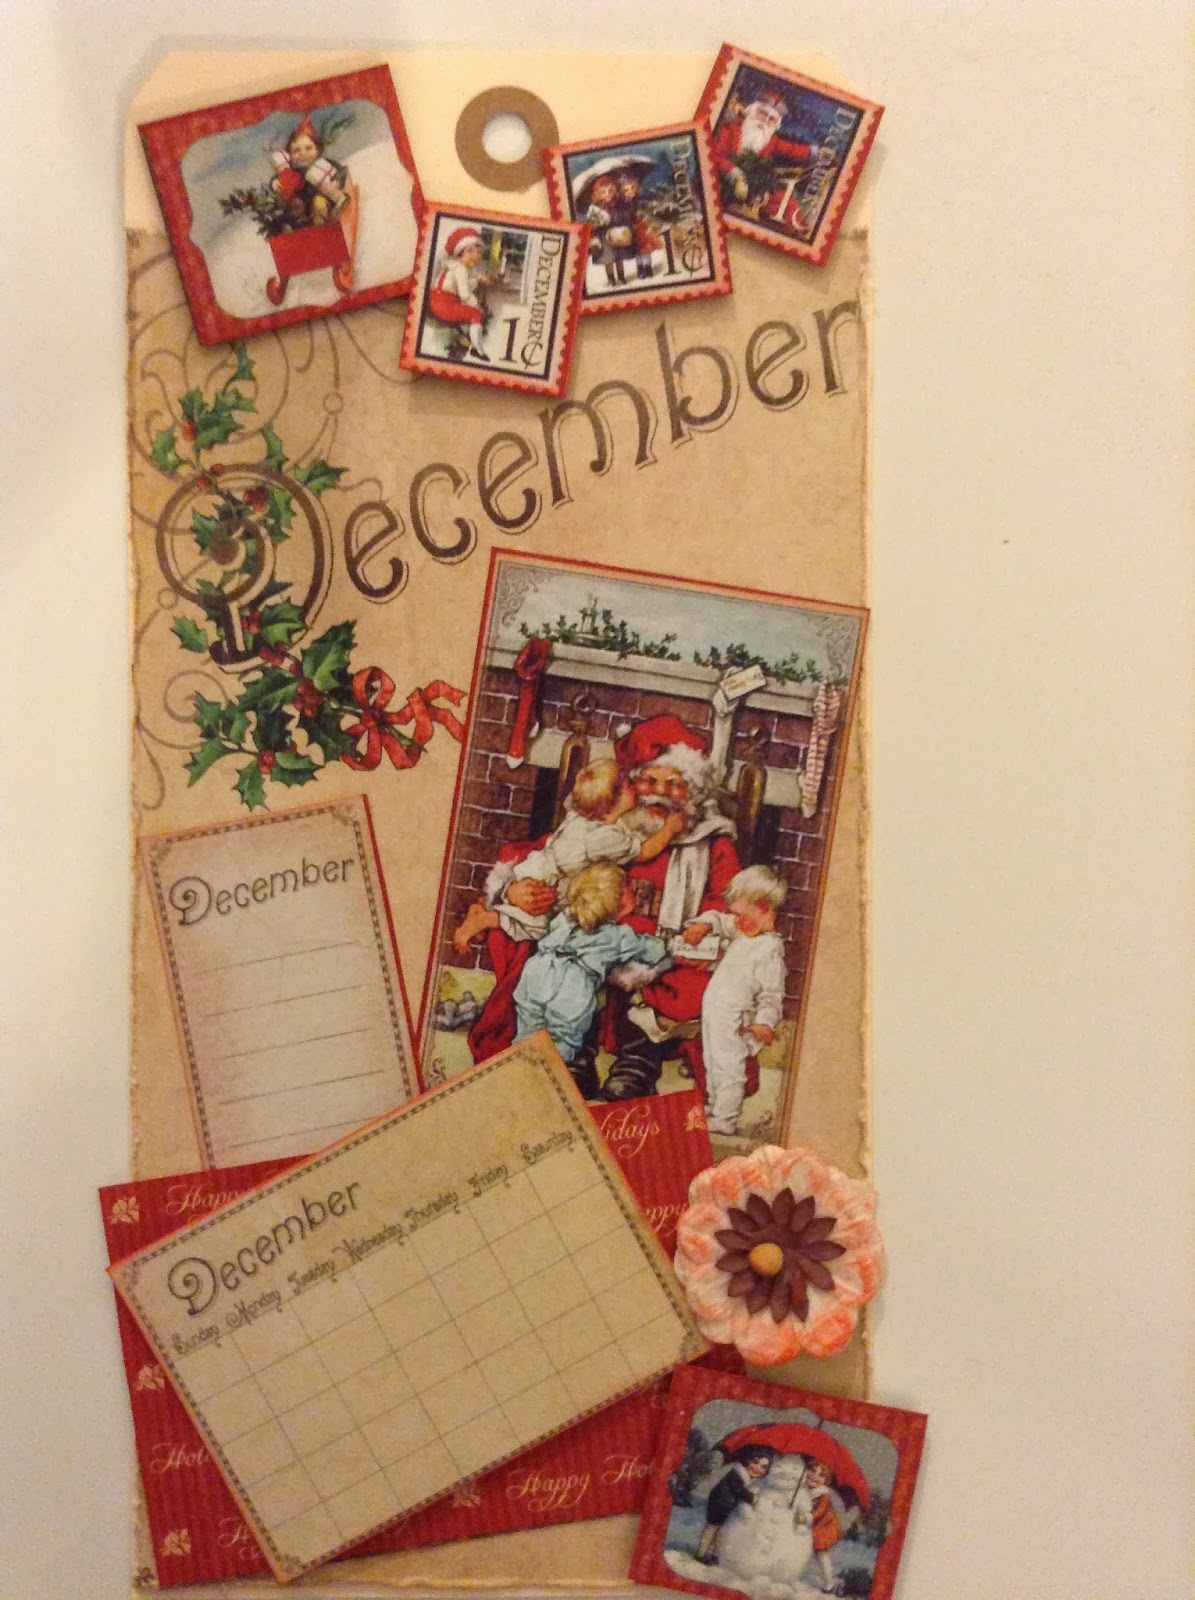
This is a beautiful tag calendar that can be used to remember everyone's birthdays. There is a calendar on the front of each tag and plenty of space on the back to jot down important dates.
It is free standing and decorated using the gorgeous graphic 45 "A Place in Time "papers which you can purchase at Crafters Cupboard, along with the other materials I've used.

Products used:
12 x large manilla tags
8" x 8" Place in Time graphic 45 paper pad
Small prima 'Donna' flowers
Magic mount
Double sided tape
Distress inks
Large metal binding ring
Collection of coloured fibbers


Instructions:
Cut down each of the 12 month pages, distress and ink the pages using antique linen distress ink.
There is a page of cut outs for each month. I have chosen to use a couple of larger pictures, a piece of the background papers and some of the small stamps on each page.

Each piece I have inked in a co-ordinating distress ink and then used magic mount to create height and different layers on each tag.

I have finished each tag by Inking the flower using my blending tool and the co-ordinating distress ink and then edging the whole tag.


And here it is, the final Month of the Year, staring us in the face already. I hope you have enjoyed the Birthday Tag project - a quick, easy and fun little project to make for yourself, or as a gift.


Until next time …
Enjoy !
Holly

Jennifer's Comment

Holly - thank you for sharing this great little tag book idea with us and I hope all our readers have been inspired to make one, either using the Graphic 45 papers, or similar.

We'll be back in the next few days with the next DT submission to share with you all

Until then, Happy Crafting everyone !

Jennifer